3D Layered SVG Dinosaurs: Bringing Prehistoric Art to Life with Digital Craft
When you first see a finished 3D layered SVG project, the effect is almost magical. A flat digital file transforms into a dimensional artwork with depth, shadow, and presence. Among the most popular subjects in this growing craft is the dinosaur—and specifically, designs like 3D Layered SVG Dinosaur 6 have captured the imagination of hobbyists, educators, and makers alike. But what exactly is a 3D layered SVG, and why has it become such a compelling medium for modern creativity?
This article walks through everything you need to know: from the basic concept of layered SVGs, to how a design like Dinosaur 6 works, why dinosaurs are a perfect subject, and how you can use these files in real-world projects. Whether you're a complete beginner or someone with cutting experience, you'll come away with a clear understanding of the technique and its practical value.
What Exactly Is a 3D Layered SVG?
Let's start at the foundation. SVG stands for Scalable Vector Graphics—a file format that uses mathematical paths rather than pixels to define shapes. This means an SVG can be scaled to any size without losing quality. It also means each element of the design can be separated, moved, and recolored independently.
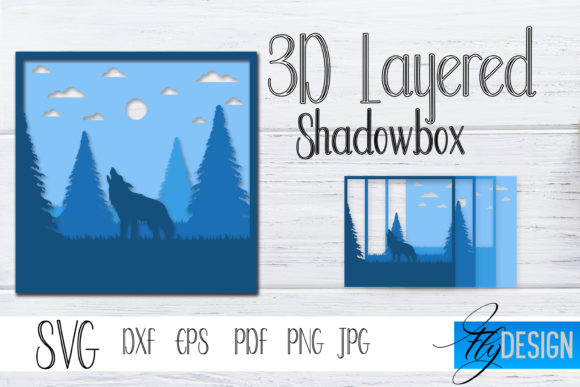
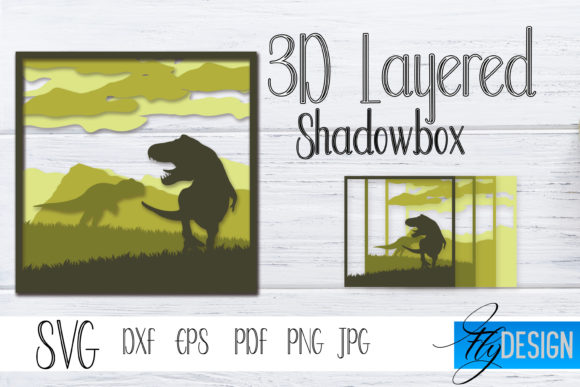
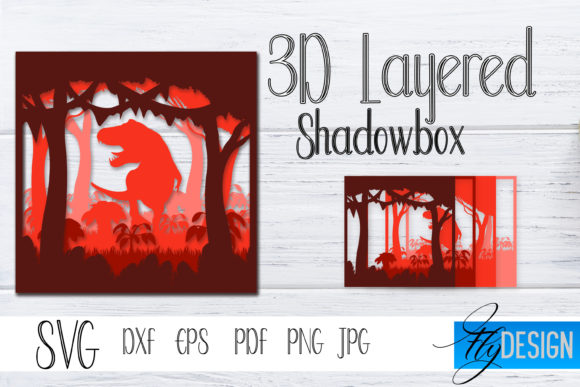
A 3D layered SVG takes this idea further. Instead of being a single flat image, the file is organized into multiple layers, each representing a different depth or slice of the final artwork. When you cut each layer from a material—often wood, cardstock, or acrylic—and stack them with spacers, the result is a physical piece that has real depth. The layers create shadows and highlights that mimic three-dimensional form.
This technique is sometimes called "shadow box" art or "stacked layered" art. It bridges the gap between digital design and physical craftsmanship, and it has become enormously popular in the laser cutting and paper craft communities.
The Beauty of Layer-by-Layer Construction
Each layer of a 3D layered SVG is carefully designed to build upon the one behind it. The back layers form the background or deepest parts of the scene. Middle layers add mid-ground details, and the front layers hold the most prominent elements—like a dinosaur's head, body, or distinctive features.
With a design like Dinosaur 6, the layers might be arranged as follows:
- Background layer – a prehistoric landscape silhouette, perhaps with volcanoes or trees.
- Mid-back layer – the dinosaur's body and tail, rendered in a darker tone to suggest depth.
- Mid-front layer – the head, legs, and spikes or plates, bringing the shape into focus.
- Foreground layer – fine details such as eyes, claws, or textured patterns.
When you view the stacked piece from the front, your eye interprets the gaps between layers as depth. This is the same principle used in dioramas and pop-up books, but here it's executed with precision using digital vector files.
Why Dinosaurs? The Timeless Appeal of Prehistoric Subjects
Dinosaurs have an almost universal fascination. They are ancient, mysterious, and visually striking. For designers and makers, dinosaurs offer several advantages:
- Recognizable silhouettes – A T. rex, triceratops, or stegosaurus is instantly identifiable even in outline, which is perfect for layered cutting.
- Rich texture possibilities – Scales, horns, claws, and bony plates give designers plenty of elements to separate into layers.
- Educational value – Dinosaur projects are popular in classrooms and children's rooms, where they combine art with natural history.
- Nostalgia and playfulness – Dinosaurs appeal to both kids and adults, making them ideal for gifts, decor, and learning tools.
Dinosaur 6: A Case Study in Layered SVG Design
The specific design referred to as 3D Layered SVG Dinosaur 6 is likely part of a series—each design numbered for easy reference. While the exact dinosaur varies, a "number 6" in a series often represents a well-developed layout, typically featuring a balanced composition of background, body, and fine details.
In practice, Dinosaur 6 might depict a walking brachiosaurus or a roaring carnivore, depending on the artist's style. What makes it stand out is how the layers are organized. In a good layered SVG, each piece locks together logically. You should be able to see exactly where each layer sits and how it contributes to the overall depth.
For example, in a typical Dinosaur 6 layout:
- Layer 1 (back): Sky or ground with distant mountains.
- Layer 2: The dinosaur's back legs and tail, partially obscured by the body.
- Layer 3: The main torso and head, with cutouts for eyes or nostrils.
- Layer 4: Front legs and any foreground terrain like rocks or ferns.
- Layer 5 (front): Accent details such as spikes, claws, or a sun in the corner.
This layered arrangement creates a sense of motion and presence. When lit from the side, the shadows between layers make the dinosaur appear to step out of the background.
How 3D Layered SVGs Work: From Digital File to Physical Art
Understanding the workflow helps you appreciate why these files are so valuable. Here is the typical process:
- Download or create the SVG. A designer builds the vector file using software like Adobe Illustrator, Inkscape, or Affinity Designer. Each layer is separated onto its own artboard or grouped within the file.
- Import into cutting software. Programs like LightBurn (for lasers) or Cricut Design Space (for cutting machines) read the SVG. The software interprets each layer as a separate cutting job.
- Choose materials. Common choices include 3mm birch plywood, medium-density fiberboard, or heavy cardstock. Different colors or stains can be used for different layers.
- Cut the layers. The machine cuts each piece precisely. Because the SVG is vector-based, the cuts are clean and repeatable.
- Assemble with spacers. Small pieces of foam, cardboard, or acrylic are placed between layers to create the gap that produces shadow and depth.
- Frame or display. The completed stack is placed in a shadow box frame or mounted on a base.
This workflow is repeatable and scalable. Once you have a well-designed SVG, you can make the same dinosaur dozens of times, in different sizes and materials, with consistent results.
Tools and Software: What You Need to Get Started
If you're new to the craft, here is what you'll need:
- A cutting machine – a laser cutter (CO2 or diode) or a blade cutter like Cricut or Silhouette.
- Vector editing software – at minimum, something to view and prepare SVG files. Inkscape is free and capable.
- Materials – plywood, cardstock, or acrylic sheets. Start with inexpensive materials while you learn.
- Adhesive and spacers – glue, double-sided tape, and foam squares to create even gaps.
- A well-designed SVG file – like Dinosaur 6, with layers clearly labeled and optimized for cutting.
Practical Applications: Where 3D Layered SVG Art Shines
These designs are far more than just a fun weekend project. They have real-world uses across several domains:
Home Decor and Personal Gifts
A layered dinosaur piece makes a striking addition to a child's bedroom, a playroom, or even a modern living space. Because you can choose the wood stain or paper color, the piece can match any decor. Many makers sell finished pieces at craft fairs or online marketplaces.
Education and STEM Learning
Teachers use layered dinosaur SVGs to teach anatomy, scale, and prehistoric life. Students can assemble the layers themselves, learning about sequencing and spatial reasoning. The tactile nature of the craft makes it memorable.
Creative Business and Side Hustles
Makers with a laser cutter or Cricut can produce multiple copies of a design like Dinosaur 6 and sell them as kits or finished art. The SVG format makes it easy to resize the piece for different price points—from small ornaments to large wall art.
Digital Design Practice
Even if you never cut a physical piece, studying a well-made layered SVG teaches you about composition, depth, and vector organization. Designers often analyze files like Dinosaur 6 to learn how to build their own layered templates.
Common Misunderstandings About 3D Layered SVGs
As with any popular technique, misconceptions abound. Let's clear up a few:
- "It's just a stack of shapes." Not exactly. Each layer must account for visible overlap, cutouts, and alignment. A poorly designed layered SVG will have gaps or misaligned edges. Good designs are precisely engineered.
- "You need expensive software." While professional tools help, many free or low-cost programs can open and prepare SVG files. The hard work is done by the designer who created the file.
- "It only works with wood." Layered SVGs work with paper, cardstock, acrylic, felt, and even thin metal. Each material gives a different look and feel.
- "All layered SVGs are the same." Quality varies enormously. A good design like Dinosaur 6 will have clean paths, logical layer order, and appropriate clearances for assembly. A poor one will frustrate you.
Tips for Getting Started with 3D Layered SVG Projects
If you're ready to try your hand at a design like Dinosaur 6, here are actionable steps:
- Start with a reputable source. Buy or download SVG files from designers known for layered work. Look for preview images that show the layers separated.
- Check the file format. Make sure the SVG is compatible with your machine's software. Some files come with DXF or AI alternatives—that's a good sign.
- Test with cheap material first. Cut the design in cardstock before using expensive wood. This lets you verify fit and alignment.
- Label your layers. As you cut, keep the layers organized. Use tape or clips to group them in order.
- Experiment with spacing. The gap between layers dramatically affects the final look. Use thin spacers (1–2 mm) for subtle depth, or thicker spacers for a more dramatic shadow box effect.
- Lighting matters. Display the finished piece where it will catch side lighting. That's what makes the layers pop.
Conclusion: The New Depth of Digital Craft
3D layered SVG art represents a beautiful intersection of digital precision and handmade craft. A design like Dinosaur 6 is not just a set of cutting paths—it's a blueprint for physical depth. By understanding how layers work, why dinosaurs make compelling subjects, and how the process fits into modern life, you can appreciate both the art and the technique on a deeper level.
Whether you are a maker looking for your next project, a teacher seeking a hands-on activity, or simply someone curious about how flat files become dimensional objects, layered SVGs offer a satisfying and accessible path. The next time you see a finished dinosaur shadow box, you'll know exactly how it came to be—and maybe you'll be inspired to create one yourself.